PoSmedley PoSmedley

One Piece At A Time : Windowblind Tutorial Part I

One Piece At A Time : Windowblind Tutorial Part I

Design : Start Menu and Taskbar


Okay. This is it. I've been sitting on it most of the day after bugging a few folks  for their opinions.

2of3 offered to help me with this. Vampothika & neone6 also offered help and support.

I decided to go with something new to get a fresh start and came up with this. Hopefully, it's simple enough so as not to be problematic along the way, but stylish enough that a lot of you will like it and it won't be too easy so I (and you) can learn from it as we go along.

2of3 was kind enough to send me some files to follow as sort of a workflow to keep organized. We're gonna go one piece at a time and won't be moving on to the next until the one we are on is good.

PLEASE :

  • I am open to suggestions but may not use any of them. Please, don't be offended if I don't use yours.
  • Keep the image posting to the skin(s)
  • If you want to make a skin to go with this, PM me for the files. My PSD's tend to be a mess, but I save everything and will be happy to     share.
  • We'll be skinning for Windows7, maybe Vista. If someone wants to do XP, PM me and I will get you what you need.
  • Any files you request will come as I complete them. I won't be jumping ahead. Please be patient.

So...this is pretty much it. How the rest of this thread progresses and shapes up will depend on how the back and forth transpires. If I leave something out as we go along and you want me to back up, give a yell. I'll be happy to.

If this is the only skin I ever do, we're gonna go through it from start to finish so enjoy.

What you see above is the Start window (I'll probably be going with the darker of the two). (401 px x 500 px)

These were the drafts.


UPDATE 1/17/2012 : gmc2 is going to attempt to do the Wiki for this. Woot! Based on that, I think we'll be doing more than one thread as we progress. THIS particular thread will be the basic design/draft of all the parts. Hopefully, this will make it easier for gmc2 to do his thing and make it easier for anyone to follow the progress.

I'll be asking for suggestions from time to time. Feel free to PM me anything.

Also - If you want to make anything to go with, this here is a color chart if it helps. I'll be sticking to these colors. Any variations will be due to shading/effects or 'overlay' layers.

-------------------------------------------------------------------------------------------------------------------------------------------------------------------------

NOTES: Start Menu and Taskbar -

  • Leather Effect - There are a lot of good tutorials for leather effects around. For Windowblinds there is the issue of tiling and stretching and the details of the effects can make or break the skin. I had to come up with my own to try to keep it simple. In PHOTOSHOP, make your object and go to Filters>Textures>Texturizer - Select Sandstone - Scaling 60 - Relief 2 - Lighting Top (IF you have a copy of Rust Flakes in your Texturizing filter, you can make a much more textured leather)
  • Thread/Stitch Effect : There are a lot of tutorials for this but most involve Adobe Illustrator at one point or another. My issue was keeping the stitching straight and uniform. (The draft on the far right of the second image above shows how it looks 'freehand' .) I did find one for Photoshop that was great (It was the only one I found that relied entirely on Photoshop). Besides helping me with this, it also shows what you can do with your brushes to get some different results and can be fun to play with if you're unfamiliar with this technique. Here is the link for the Photoshop Tutorial.
  • Start Menu - 401 px x 500 px (This was my choice after talking to Tim. I will get back here as to recommended size and why)
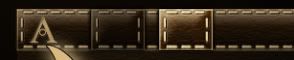
  • Taskbar  - 400 px x 50 px - If you have looked at a lot of skins like I have, you may notice that 35 to 38 px is pretty common. Some mentions have been made in this thread as to what specifically can alter/control your taskbar size. For this particular skin, I am going with a 50 px taskbar to accommodate the stitching. It is a 'rounded corner' taskbar' and the png is different than one you might use for a taskbar that spans the width of the screen. (I will post the png when it is ready) I will, for sake of this tutorial, skin all of the buttons for the taskbar so we can give an example of what the finished png might look like. (Again, I will post when I have it done.)
  • Taskbar Buttons - For this skin, mine will be 50px x 50 px - They will be in the following order normal ,pressed, disabled, highlighted, activated, activated & highlighted. (Picture to be posted when complete)

-------------------------------------------------------------------------------------------------------------------------------------------------------------------------

If you're looking for Part I, II, III you can find them here:

One Piece At A Time : Windowblind Tutorial Part I

Design : Start Menu and Taskbar


One Piece At A Time : Windowblind Tutorial Part II

Design: Title Bars & Window Frames


One Piece At A Time : Windowblind Tutorial Part II

Design: Edit Controls


PLEASE :

  • I am open to suggestions but may not use any of them. Please, don't be offended if I don't use yours.
  • Keep the image posting to the skin(s)
  • If you want to make a skin to go with this, PM me for the files. My PSD's tend to be a mess, but I save everything and will be happy to     share. I am uploading the actual files to the Graphics Gallery here on Wincustomize.
  • We'll be skinning for Windows7, maybe Vista. If someone wants to do XP, PM me and I will get you what you need.
  • Any files you request will come as I complete them. I won't be jumping ahead. Please be patient.
  • ;)

-----------------------------------------------------------------------------------------------------------------------------------------

The PSD files for the  previous threads are in the Graphics Gallery.

Roan WB Title Bars and Window Frames  

  Roan WB Taskbar Buttons

Roan WB Title Bars and Window Frames  

  Roan WB Taskbar Buttons

291,818 views 227 replies
Reply #26 Top

Quoting neone6, reply 25
Actually,Po, you could do the Taskbarbuttons exactly the same height as the taskbar itself and therefore use the Side-stitching aswell as parts of the T.B. top/bottom-stitching for the button-sides. Just make a little nice shadow under the buttons and they will look nice on the T.B. although same height/covering it....

I think I follow you on that but not sure.

Reply #27 Top

The rounded corners is do-able, but more difficult. For either taskbar, you are going to need to use layers so you can tile the pattern, stitching and highlight differently from each other. I think the rounded corners one matches the start panel best.

One thing you should know about the taskbar. When you set your text margins on the buttons, it will change the height of your taskbar. The bigger you set the text margins, the taller your taskbar gets. This is why it's important to have your leather texture tilable, and why it may make the stitching on the ends a headache. It can be done, but it's going to take some tweaking along the way to find out the best settings.

Yes, I would resize the stitches on the start panel to match the taskbar.

Reply #28 Top

i personally prefer the taskbar with the rounded edges, it matches the startmenu.

im not sure about if anyone stretches the startmenu anymore, but most people in windows 7 either choose large or small icons, when you choose large, obviously, the taskbar stays full size, when they choose small size, it halves the size. this is where the problems start.... for your taskbar.

with this design, i dont think you can get away with it looking good when it is reduced in size for small icons, but maybe you can? who knows.

also, are you going both task menus or only one? some people have their task bar up the top of the pc.

so far its looking good, and i hope this helps...and dosent hinder you anyway.

xx kitty


Reply #29 Top

Is it OK to place bets on this never getting finished?

  }:)

Reply #30 Top

PO, About the taskbarbuttons... :sun:

 Edit: they would have to be tiled sideways if "Long with text"´s used so the stitching doesen´t stretch then.

Reply #31 Top

Quoting Xiandi, reply 27
One thing you should know about the taskbar. When you set your text margins on the buttons, it will change the height of your taskbar. The bigger you set the text margins, the taller your taskbar gets. This is why it's important to have your leather texture tilable, and why it may make the stitching on the ends a headache. It can be done, but it's going to take some tweaking along the way to find out the best settings.

*reaches for Advil

Quoting Vampothika, reply 28
also, are you going both task menus or only one? some people have their task bar up the top of the pc.

Both. I want to skin as much of it as possible.

Quoting Zubaz, reply 29
Is it OK to place bets on this never getting finished?

WHERE IS THIS IGNORE BUTTON I KEEP HEARING ABOUT?

Quoting neone6, reply 30
PO, About the taskbarbuttons..

Okay. I did get what you were saying.... I think I want to leave any trace of the edges out though. I think it makes the taskbar look more like it's one solid object, if that makes sense.

Quoting Vampothika, reply 28
when they choose small size, it halves the size. this is where the problems start.... for your taskbar.

SMALL SIZE? I didn't even know you had that option with 7.

WHERE is that ignore button?!?!?!? ;)

Reply #32 Top

on a side note , I'm wondering if I might want to upgrade my Leather Bound icon collection to a full IP to match this WB if it ever gets completed. Always hoped someone would make a leather themed blind.         --Ace --

Reply #33 Top

Thanks Po for starting this tutorial. I have been out of the loop far too long. This will help big time. Rock On!  :sun:

+1 Loading…
Reply #34 Top

Quoting AceMatrix, reply 32
I'm wondering if I might want to upgrade my Leather Bound

Nice icons. WHat do you have in mind as far as updating them? PM me and let me know if you need anything from me.

Quoting PoSmedley, reply 34
if it ever gets completed

I'll say it one time. I'm committed. These threads will be the only forum posts I make on WC from here on out, until it's done.

Reply #35 Top

Quoting PoSmedley, reply 34
I'm committed
So, the guys in white coats finally cornered you. I'm very glad you stuck with skinning, your basket weaving skills probably suck.

Reply #36 Top

Jupp the buttons could be a problem, if someone does use small buttons on the taskbar but i believe the majority uses the standart size like it should be...

looking fantastic btw

Reply #37 Top

I started a leather skin ages ago............... binned it shortly after starting. Just saying................ :)

Reply #38 Top

Quoting BoXXi, reply 37
I started a leather skin ages ago............... binned it shortly after starting. Just saying................
Gawd, I'd love to get my hands on some of the things you've 'binned'.
Quoting PoSmedley, reply 31
I think I want to leave any trace of the edges out though. I think it makes the taskbar look more like it's one solid object, if that makes sense.
That looks like it would be do-able... with large and small taskbar. |-)

Reply #39 Top

If you´re not crazy about the dark TB-Button you could  have one state only WITH edges to make it differ... :|

Reply #40 Top

Quoting neone6, reply 39
If you´re not crazy about the dark TB-Button you could have one state only WITH edges to make it differ...

I may have to do both and see what happens when we start putting it together. It just occurred to me these may look awful when grouped in 7.

Quoting Xiandi, reply 38
Just saying..

I keep HITTING the ignore button but it's not freaking working.

Reply #41 Top

@HeirOfSlytherin: I'd love to see you make something for Win7. A remake of Iron Horse would make my year.

Back on topic: I'm really liking that leather look. Any chance of a black substyle?

Reply #42 Top

Quoting Xiandi, reply 27
One thing you should know about the taskbar. When you set your text margins on the buttons, it will change the height of your taskbar. The bigger you set the text margins, the taller your taskbar gets.

Man this thread is going to be great and already is actually. I never knew about the taksbar height changing with the button text margins. I always set it at one number and used that number for all my skins. No wonder changing the height of my actual taskbar didn't do anything. Me thinks a lot of hidden stuff is going to come out to help everyone. This rocks.

Reply #43 Top

Quoting PoSmedley, reply 34
PM me and let me know if you need anything from me.

P.M. Sent......................  -- Ace --

Reply #44 Top

Quoting PoSmedley, reply 34
I'll say it one time. I'm committed. These threads will be the only forum posts I make on WC from here on out, until it's done.


Proud of you Noah!!!  

Reply #45 Top

Quoting Wizard1956, reply 41
Any chance of a black substyle?

I don't know about black. I had considered blonde (seriously) but substyles...I was just thinking versions (Vista, 7). BUT - This does desaturate rather nicely in PSP (Black had crossed my mind so I wanted to see) and I assume it will in Windowblinds.

Reply #46 Top

Quoting PoSmedley, reply 40


 It just occurred to me these may look awful when grouped in 7.

It will werk if you put the stitches all the way to the edge ;)

AND choose one style, for it will be enough werk as it is -trust me. (Black WAS nice) :sun:

Reply #47 Top

Quoting Xiandi, reply 38
Gawd, I'd love to get my hands on some of the things you've 'binned'.

I binned my butt cheeks a while ago............ :rofl:

+1 Loading…
Reply #48 Top

Quoting BoXXi, reply 47
I binned my butt cheeks a while ago...........

You had no choice. I heard Goodwill wouldn't even take them.

Quoting Vampothika, reply 28
i personally prefer the taskbar with the rounded edges, it matches the startmenu.

So do I.

Top or Bottom?

Wait..

I mean 'A or B'?


Reply #49 Top

Quoting PoSmedley, reply 48


I mean 'A or B'?


-Kitty says A.

Reply #50 Top

Quoting neone6, reply 49
-Kitty says A.

Yeah. The stitching at the bottom doesn't work with the rounded corners as well.

SO...the buttons. (HA!)

Anyway .. with or without the edges visible? I'm really torn on this.  And if I do the edges what about the shadow? (See circles - with and without)