Dirty Sanchez's Custom Maps -- coming soon to 5v5 and 4v4 pugs and 3v3 games on ICO
Download links and Installation Instructions
Thread Shortcut: If you are in the Sins game and you are trying to help someone add custom maps, you can easily direct them to this thread and the installation instructions by telling them to go here: http://tinyurl.com/Sins5
Over the past week I have been making a renewed effort to get everyone in our small pug community add my custom maps to their Sins game and last night we played a great 5v5 on Red Crush. As more and more people add the maps, it will become easier and easier for us to host them and I will be motived to produce more. Also, once folks have learned how to add custom maps to their game and they see how easy it is, getting them to download and add new maps shouldn't be a problem (it takes less than 2 minutes and can be done while waiting for games).
Why play custom maps? Because a custom map can be intentionally designed for online multiplayer competition and also to promote or require teamwork. The sides can be made as fair as possible for each team and no one receives a randomly bad starting position. (It's conceivable that a good custom map might have some bad starting positions for some players on each team by design, but that's a different story.)
Anyway, I hope that we can take pugging to the next level with interesting 4v4 and 5v5 maps.
Download: http://tinyurl.com/Sins3
(The v03's in the map names indicate that the maps are version 3 maps, which means they'll work with Sins v1.17 and Entrenchment 1.03.)
Asteroid Belt maps: Players start near their allies on opposite sides of the star, separated by an asteroid belt. The asteroids are guarded by large militias to make it tougher for people to rush to colonize them. Asteroids, of course, are easy to bombard and liberate, and the asteroids are interconnected by a web of phase lanes, so expect frantic game play as these juicy 'roids change hands.
- Asteroid Belt 1v1 -- for 1v1.
- Asteroid Belt 2v2
- 3v3 Asteroid Belt -- the original Asteroid Belt map.
- Asteroid Belt 3v3 neutrals -- this one has more neutral extractors.
- Asteroid Belt 4v4
- Asteroid Belt 5v5
Gateway to Paradise: Players start near their allies and are separated from the other team by a small ring of planets around the star. A second, empty star offers lucrative planets. Should you focus on fighting your way around the ring or should someone head for the empty star? Who should do what? This map requires having a team game plan. We've played this one several times before in the past and everyone seems to like it. I've even been asked to make 4v4 and 5v5 versions of it.
- 3v3 Gateway to Paradise
Ring of Risk: Players start near their allies and are separated from the other teamy by a ring of planets. Working your way around the ring is the only way to get at your enemies. However, a long chain of lucrative planets lies on either side of the ring, almost right in the middle. Do you focus on fortifying your positions on the ring or will you try to take the planets on the strings? You could assign one player to play one side of the ring, another to play the other side, and one guy to work on one of the planet chains, but how do you take both planet chains? I had previously thought that this map wouldn't work so well, but some of the folks in BIA and DU liked it and the games I played on it were fun and challenging.
- 3v3 Ring of Risk
- Ring of Risk-2 3v3 -- this one has one additional asteroid on each side, ending the asteroid bottleneck in the middle of the ring. It also has some additional neutrals.
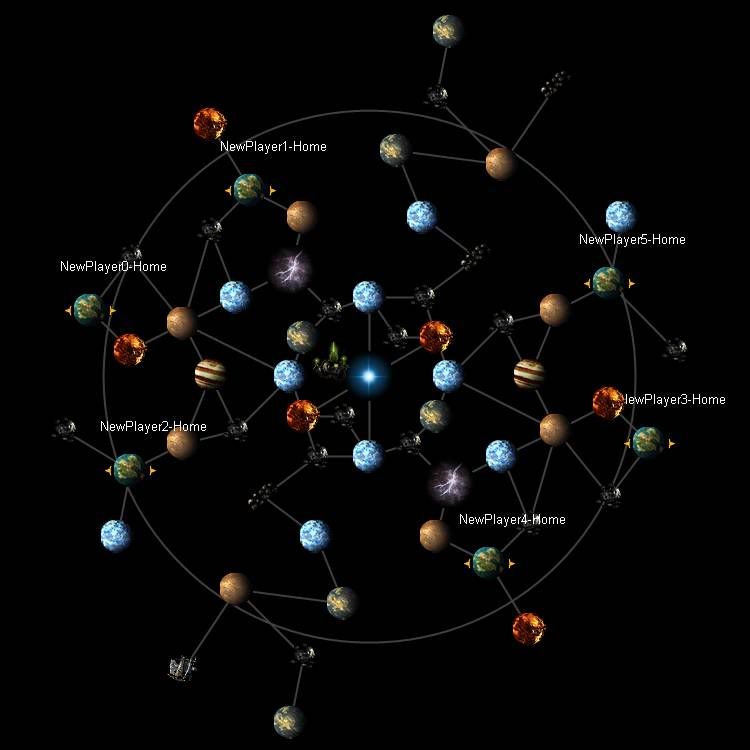
Brilliant Diamond: Vasari astronomers call this star system the Brilliant Diamond. I wanted to make another map like Asteroid Belt but with asteroids around the star in a square shape, which allows for two starting positions on each side. (I suppose I could expand it to 5v5 by adding a third position on two of the sides.) This map comes in three flavors. In 4v4 Near each team has two adjoining sides of the diamond, so two people are in eco slots and two have one-sided flanks. In 4v4 Far, groups of two allies start across from one another on opposite sides of the diamond with groups of two opponents inbetween them, so everyone has an ally on one side and an opponent on his flank, around the corner. On the 2v2v2v2 map you and your ally will own one side of the diamond. Personally, I think playing it will be most interesting to play it in 4v4 Near. The only downside of this map is that it's a little bit larger than most maps in that it has a 10 planet-to-player ratio, but they are mostly roids. Each corner of the map also has a small side-loop of planets players can fight over.
- Diamond 4v4 near
- Diamond 4v4 far
- Diamond 2v2v2v2
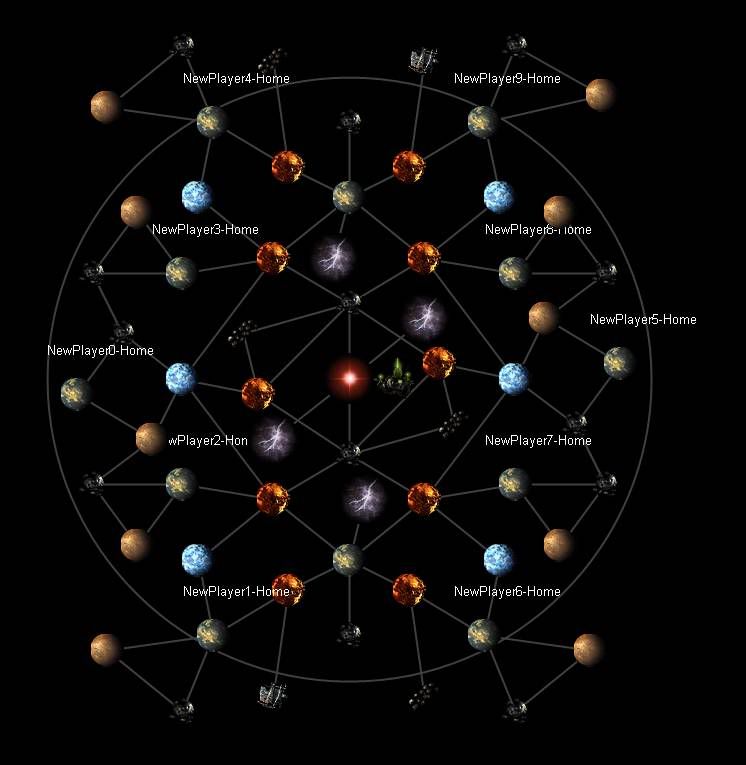
Red Crush: This was my first map as well as a 5v5 map. It's the big one on the Red star! (Actually, it's really not all that large in terms of the planets-to-player ratio.) Players start near their allies and are separated by four chokepoints in the middle which allow access to the opponents' planets. Expect fortifications and fights over the chokepoints. Does it make sense to rush to take and fortify the chokepoints at the expense of colonizing your nearby planes? This map also emphasizes teamwork. Who should take the ice planet between the guys on the ends? Which side should the player in the middle fight on or should he go eco or go for Superweapons? (We played Red Crush-2 last night and had a great game on it.)
- Red Crush -- this was my first map and it doesn't have any neutrals but people have played it before and enjoyed it.
- Red Crush-2 5v5 -- play this one.