DesktopX Step-By-Step Tutorials #12
Stepping Thru States
from  WinCustomize Forums
  |
|||
| Step-by-Step Tutorials |
#12 - Stepping Thru States |
||
|
A series by RomanDA |
|||
|
Listing of other DX Tutorials: Click here Today's Lesson: "Stepping Thru States" is a very simple way to setup multiple states with a button to change between them. In this lesson we will cover how to create a simple object, then add multiple states to it, and add a simple button to "step" thru the states. For this and all the Step-By-Step DX Tutorials you will need to purchase DesktopX for $14.95 from Stardock. See previous tutorials for how to load DX & create a new object. Lets get started. |
|||
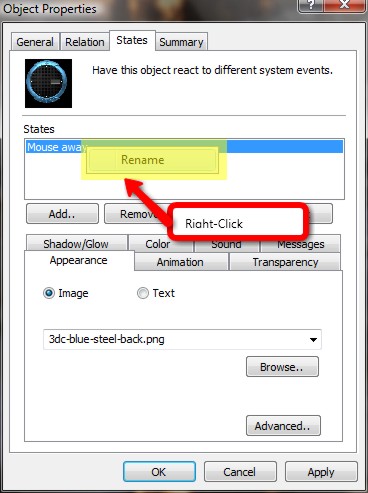
| STEP 1 - Create the first object "state" | |||
| With DX loaded and running, add a new object, goto the "STATES" tab and here we will assign the object a new image and then rename the state to "1" Browse to the 1st background image you want to use, and select it. Then use the steps below to rename the state to 1.
|
|||
| STEP 2 - Create More States | |||
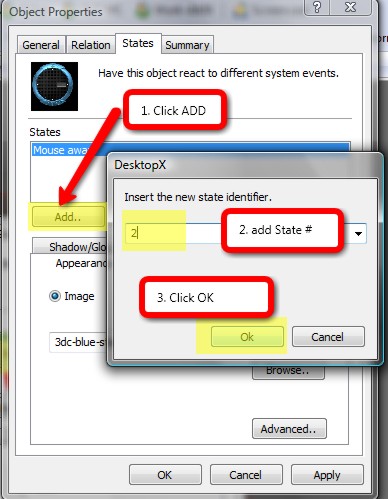 |
Add a new STATE naming it "2" and assigning it to the next background image. You would continue this for ALL the states you want to add. In our case we will make the TOTAL 8 states. Repeat - till you have all 8 states added. "OK" it all when its done. |
||
| STEP 3 - Adding the code to step thru the states. | |||
|
Edit the above object and click on "NEW SCRIPT". We will be adding the following script. Code: vbscript
|
|||
| You could also add multiple "state" changes to other objects as well (things like Clock hands, or color changes to text objects, etc. | |||
| CONCLUSION | |||
| There is a lot more you can do with this, but these are the basic steps to setting up the Stepping Object State Changer. This works great for clocks, and lots of other items where you want to have multiple looks/colors/layouts.
|
|||